Completing the Framed Lace

Basically, the final rows a one-piece end-to-end scarf with inner and outer borders is a reverse of the beginning. But there are some differences to be noted.

In Overview of Spring Lace Leaves Scarf, I outlined the roadmap for an end-to-end one-piece scarf with knit-as-you-go inner and outer borders. In earlier support articles this month, so far we’ve covered the lower outer border, introducing the inner border, then continuing the established outer and inner borders at each side of the main area lace pattern.

Overview of an end-to-end scarf with knit-as-you-go lace edging

Overview of end-to-end scarf with knit-as-you-go lace edging

As you approach knitting the full length of your scarf, it will be time to complete the “frame” by finishing your knitting with the upper inner border and finally the ending outer border.

As a reminder, here is the roadmap using Spring Lace Leaves Scarf as our example.

Border at Other End of Scarf

Basically, ending the scarf with inner and outer borders is a reverse of how we began. But there are some slight differences to be noted. These are detailed in your pattern instructions so you don’t have to figure anything out on your own. But I wanted to further explain the design rationale for those who have the interest.

Inner Border Symmetry

It’s not always possible to create exact inner border symmetry around a Main Area lace knitting stitch pattern, but but there are strategies to get close to that look.  Continue reading

Posted in Bit-size Tutorials | Leave a comment

Discover a Gem: Printer Friendly (and Create PDF) Feature

Patty T wrote: ” I love the ‘Print/PDF’ function on the Bonus Pages — makes life a lot easier.

With the continuing expansion of the KnitHeartStrings Site, it’s probably easy to overlook some of the newer (and possibly even the older) features besides the main Knit-A-Longs page. This is the next in series of Site Help articles to get the most from your KnitHeartStrings membership today and every day.

This week’s highlighted feature is Printer Friendly. Might you not realize it is available and could be missing out? The Print/PDF button icon for this feature is currently located in the right side-bar of the site just beneath “Search Posts…” and above “Recent Posts” (the location and exact look of the button could change in the future, but the important thing is that you know it is available and that it looks something like this below).

printerfriendlybuttonscreenshot

Clicking on the Print/PDF button launches a new window on top of your screen. From there, Printer Friendly gives you options to print with or without pictures, to enlarge text (or make text smaller to save ink), and even to create a pdf file (although it’s not necessarily “pretty” – but if that is the format you prefer for your iPad or whatever, it will do). Also you can email the article link to a friend.  Continue reading

Posted in Site Help | 2 Comments

Bonus: an option to beading the Lace Leaf pattern stitch

Joy wrote: ” This is a gorgeous pattern I’ve been looking forward to very much. I would indeed appreciate some beading advice PLEASE, beads add so much to an accessory like this one. Thank you for this pattern, and this site!

For the wonderful, supportive members of KnitHeartStrings who are interested in a beaded option for this month’s KAL Spring Lace Leaves Scarf, I am pleased to share this version. Please enjoy it as such, or just use it as a jumping-off point for your own creative placement of beads. (Note: the in-progress picture shown below is using some of my handspun yarn and is unblocked.)

Beaded version of Lace Leaves scarf

Continue reading

Posted in Bits of Beads | Tagged | 4 Comments

Bias Effects in Lace Patterning

simple dramatic effects in lace

Some of the most interesting and versatile lace stitch patterns are in fact the simplest to knit. I am particularly fond of the ones that undulate organically without any extra effort on my part. This is called a bias lace fabric. Many of the most beautiful lace patterns make extensive use of bias.

The Meaning of Bias in Lace

In lace, the term “bias” refers to knitted stitches that lie on an angle instead of vertically.

Tip: Although you might have grown accustomed to thinking of bias as a bad thing in knitting, in lace we are talking about a good thing!

Bias stitches add movement to knitted fabric, creating an organic feeling and visual excitement. The effects can be seen in both the interior of the pattern area as well as at the edges.

First, the stitches on an angle create a dimensional quality to the pattern design by creating shapes that seem to add depth to the fabric. Second, they affect the outline of the pattern’s edges, causing some or all sides to scallop and zigzag.

What Causes Bias in Lace

When yarn over increases are separated by one or more plain stitches from their compensating decreases, bias lace fabric will occur.

Let’s look at the Lace Leaf pattern stitch used in the Main Area of the Spring Lace Leaves Scarf as an example of a bias lace stitch pattern.

After you have worked several rows of the Main Area, do you see what is happening?

Bias effects in lace patterning

The lower edge of the Main Area has an upward scallop. This is caused by non-adjacent yarn over increases and their compensating decreases on rows 1, 3, 5.

Now look at the edges between the central Lace Leaf area and the Inner Border. They are wavy rather than straight.

bias effects on knitted fabric

The side edges have a zigzag shape. Also, the stitches within the main Lace Leaf area are at a tilt. The effects are especially noticeable in a variegated yarn where you can see the tilt of the rows of stitches. I have highlighted some areas in red below to demonstrate this.

direction of bias effects highlighted in red

For all these years I have knitted lace, I still find bias lace patterns extremely exciting to both knit and enjoy the result. I hope you do, too!

Posted in Bit-size Tutorials | 1 Comment

Combining Knitted Lace and Lace Knitting

How are you doing on your Spring Lace Leaves Scarf for this month’s KAL? If you have questions or comments, remember to give a shout-out on any of the support article pages or on the main Knit-Alongs page.

Main Area

After you’ve completed the Outer Border and Inner Border sections of the pattern, next comes the Main Area. You will be working the center 17 stitches of the 31-stitch row in the Lace Leaf pattern stitch, while continuing the 7 stitches at each end of row in the established Outer Border and Inner Border pattern stitches.

The central 17-stitch wide Lace Leaf pattern stitch is a repeat of 20 rows, where lace patterning is every other row with alternate “rest” rows plain purl. Thus,  you will be working both knitted lace (the Herringbone Faggot lace stitch in the Outer Border) AND lace knitting (the Lace Leaf pattern stitch).

Need a review of these terms? Lace Knitting vs. Knitted Lace

Tip: Place markers 7 stitches from each end of the needle to delineate the central Lace Leaf pattern stitches from the borders. On WS rows, you can take a “rest” for part of the row when working the plain purl stitches between these markers, but do be sure that you still have exactly 17 stitches.

Other helpful articles

Now that you are juggling both knitted lace and lace knitting, it might also be a good time to review these previous support articles:

Avoiding Mistakes

The Lifeline (insurance for knitters)

Getting  Back On Track (or what to do when inevitable mistakes happen)

Bias effects in lace patterning Next up: Bias Effects in Lace Patterning

Posted in Bit-size Tutorials | Tagged , | Leave a comment

Starting the Spring Lace Leaves Scarf

Spring Lace Leaves ScarfDepending on where you are in your lace knitting journey, Spring Lace Leaves Scarf can give you opportunities to

learn something new,
reinforce and grow confident in your skills,
– simply be inspired and enjoy the ride.

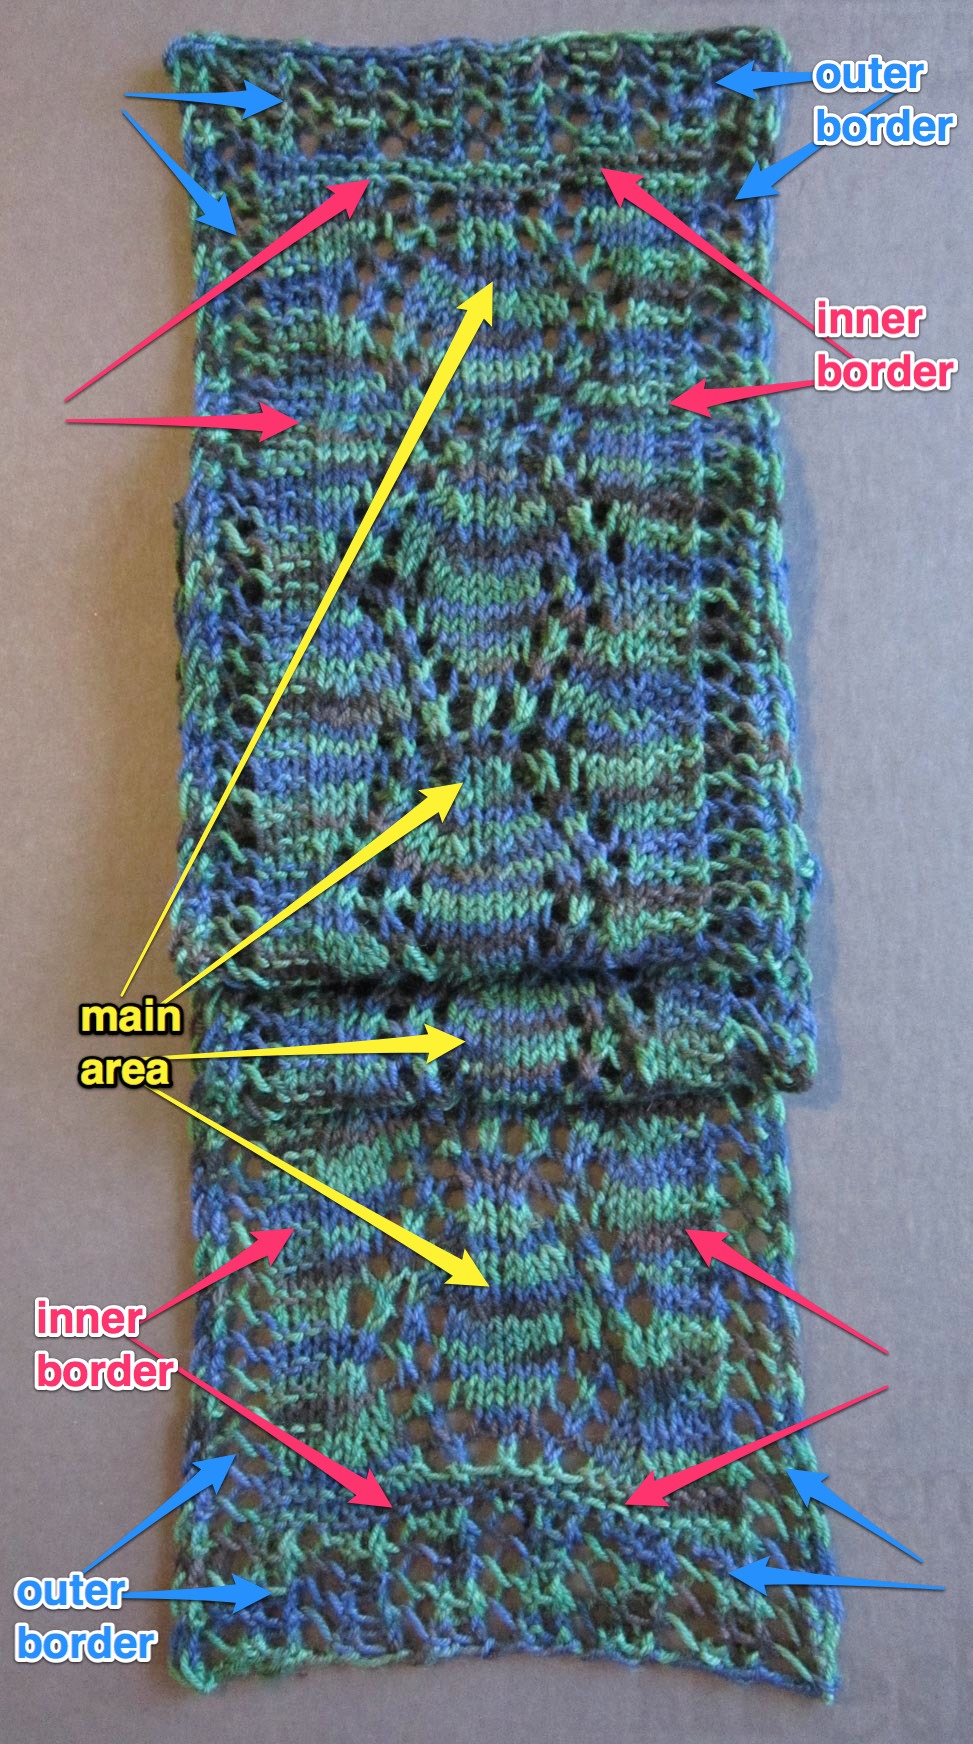
This scarf is worked from end to end in one long rectangular piece with a knit-as-you-go border framing the 4 sides. Please review The Roadmap to get an overview of the construction and acquaintance with the terminology for the Outer Border, Inner Border and Main Area.

You can start knitting anytime you are ready. I will be posting commentary and tips over the next couple of weeks. Please ask questions anytime and write about your own progress in the comments area of the knit-along page or any of the posts.

You Know More than You Realize

Ruth wrote: “I will definitely get started today. I’m sooo excited!
This will be my first attempt at lace knitting.

First off, I want to say to those like Ruth who have recently joined in and might think lace knitting is going to all be brand new, you might be surprised at how much you already know. There is no real mystery to the stitches used in most lace patterns. In fact, you probably know most of these already from your regular knitting.

In the Bit-size Tutorial You Know More than You Realize, I point out common basic stitches like those used in Spring Lace Leaves Scarf that you probably are already well familiar with. This handful of stitches serves as building blocks for a huge portion of lace knitting patterns. It is the combinations and sequence of working these stitches, plus sometimes others, that results in the beautiful lace patterns we admire.

Casting On

Because lace is usually knit more loosely than normal knitting, the cast on (as well as bound off) stitches should similarly be loose enough to be compatible with the target gauge after blocking.

What do I mean by that? You can use your favorite cast on rather than learning any new-fangled special cast on for lace. You just need to take into consideration a commonly overlooked fact that the distance between the stitches of the cast-on row is a big determinant in whether there is enough looseness in the cast on edge to stretch out as desired.

Please review the article Cast on for a Good Finish that is on my HeartStrings FiberArts website. I think you will find its tips and recommendations helpful in much of your knitting going forward.

Outer Border

The Outer Border is Herringbone Faggot lace pattern, a multiple of just 4 stitches. The cast on of 30 stitches accommodates 7 repeats of the 4-stitch multiple + a chain selvedge stitch at each end of the row; i.e.

1 selvedge + (7 x 4 for Herringbone) + 1 selvedge

Herringbone Faggot is just one row of lace repeated over and over. Since there is lace patterning on every row (i.e. yarn over holes), Herringbone Faggot is knitted lace. See Lace Knitting vs. Knitted Lace

Herringbone Faggot is also entirely reversible. Thus, technically there is no RS or WS designation so far in the pattern instructions for the scarf.

Even though Herringbone Lace is quite simple, if you are a beginner (or just easily distracted in your knitting like I sometimes am, lol) you might find it helpful to place stitch markers to delineate each 4-stitch multiple. This makes it easier to stay on track with each stitch multiple, and also to identify a problem area should your stitch count be off.  You can also review Striving for Perfect ResultsPart 1 and Part 2.

Transition Row Between Outer and Inner Border

An extra stitch will eventually be needed to accommodate the Main Area stitch pattern. After completing the lower Outer Border and before beginning the Inner Border, this is a good time to adjust the number of stitches to make the increase inconspicuous.

While working the Outer Border Increase Row, the strategy is to “hide” that extra stitch as an extra yarn over near the center of the row. Thus at completion of this transition row you will have 31 stitches.

Note: If you are using stitch markers, it is correct that the center multiple of Herringbone Lace will have been increased to 5 stitches. 

Inner Border

The Inner Border is simple garter stitch. This non-lace stitch will delineate the Outer Border lace stitch pattern from the focal lace stitch pattern in the upcoming Main Area.

Note: If you are using stitch markers, remove any except those needed to section off the first and last multiple of Herringbone Lace.

The lower Inner Border of garter stitch is worked across the center 21 stitches of the row while keeping the 5 stitches at each end of the row in the established 4-stitch Herringbone Lace and chain selvedge stitch; i.e.

1 selvedge + 4 Herringbone + 21 Garter Stitch + 4 Herringbone + 1 selvedge

Check In Your Progress So Far

Hopefully this gets you off to a good start on your knitting. Remember that if you have questions or comments, give a shout-out here or on the main Knit-Alongs page.

Posted in Bit-size Tutorials | Tagged | 2 Comments

Overview of Spring Lace Leaves Scarf

Frame It Like a Piece of Art

This month’s KAL project is an example of the approach I often use for end-to-end, one-piece scarves with a central lace pattern surrounded by a knit-as-you-go lace border.

Here is an overview of the “recipe” I use for this type of end-to-end scarf (or rectangular stole) with knit-as-you-go lace edging. Spring Lace Leaves Scarf is shown here as the example we are knitting for our March KAL. Let’s explore this annotated picture from bottom to top (i.e. the direction you will be knitting the scarf).

Overview of an end-to-end scarf with knit-as-you-go lace edging

Overview of an end-to-end scarf with knit-as-you-go lace edging

The Roadmap

Think of this as art as though it is a frame around your knitting!

The Outer Border (pointed to with blue arrows in above photo) is a simple, small-multiple lace stitch pattern. The Inner Border (pointed to with red arrows) is usually garter stitch or other simple non-lace stitch to distinguish the outer lace edging stitch pattern from the focal lace stitch pattern in the Main Area (pointed to with yellow arrows).

  1. Cast on and knit with Outer Border stitch pattern to make the lower edge plus a chain stitch selvedge at each end of the row.
  2. For transition from Outer Border to Inner Border of garter stitch, adjust number of stitches (if necessary) to accommodate the Main Area stitch pattern. (for the Spring Lace Leaves Scarf, and increase of one stitch is needed)
  3. Continuing to work a repeat of the Outer Border pattern along each edge (or sometimes 2 repeats for a wider project than this narrow scarf shown), start Inner Border on center stitches in between those Outer Borders.
  4. After a narrow Inner Border of stitches has been completed, continue the Outer Border and narrow Inner Border stitches up along each side while working the Main Pattern Stitch. (for the Spring Lace Leaves Scarf, the Main Stitch pattern is 17 sts)
  5. After the scarf is knitted nearly to length (or amount of yarn you have!), then you reverse the steps for knitting the narrow Inner Border, the decrease row (if necessary) and the Outer Border for symmetry.

Specific instructions are given in the Spring Lace Leaves Scarf pattern for this month’s KAL. I hope you will be able to knit and learn-a-long to see how this works. Sometimes seeing and reading is not enough. Learning comes through doing, If you have questions, I am here to help as we go forward.

Posted in Bits of Lace | Tagged | Leave a comment