No-sew Minimalist Seam

no-sew minimalist seam using simple half-hitch cast on and 3-needle bind off

After the knitting portion of Irish Coffee Cozy has been completed, we are now going  to join the strip of beaded garter stitch fabric into a tube.

Rather than binding off the knitting, then joining with the minimalist seaming sewn method as we did in last year’s Beading Hearts Friendship Bracelet, I’m going to cover the steps to do a no-sew minimalist seam using 3-needle bind off.

knitting portion of the project has been completed

The knitting portion of the project has been completed.

Overview Comparison of Sewn and No-Sew Methods

Because this no-sew method uses the live stitches rather than a bound off edge, the seam is even less bulky than the minimalist seaming sewn method. But otherwise, they are similar in their approach:

  • Both use the simple half-hitch cast on method to minimize seam bulk when later joining the strip of knitted fabric.
  • The first knitted row is a WS row. This sets up the first part of the sequence of “ridges” so that when the cast on is joined to the end of the fabric, there will be a matching “valley” between the ridge of the first row of knitting and the last row of knitting when viewed from the RS.
  • The last row knitted is a WS row. This sets up the 2nd part of the sequence of ridges so that when the cast on is joined to the end of the fabric, there will be a matching valley.

In both cases, the fabric as seen on the RS will have virtually an invisible seam line. Even though the WS will have some extra bulk at the seam line, it will be minimal. Not a thing to really cause any problem since this beaded garter stitch tube has a definite RS (i.e. the side that the beads show up on); the WS is not intended to ever be seen when used anyway.

Note: If you adapted to start with long tail cast on instead of simple half-hitch cast on, as discussed in Sometimes It’s the Simple Things, then one end of the yarn has already knit  on a row of WS stitches (while the other end acts like the simple half-hitch cast on). That is why I instructed you to start with the RS row 2 instead of the WS row 1.

No-sew minimalist seam using a combination of simple half-hitch cast on (or long tail cast on) + 3-needle bind off

After completing the knitted portion of the project, just leave the stitches on the needle and do not cut the yarn.

Stitch counts used below relate to the Irish Coffee Cozy, but you can use this method for  any number of stitches on other projects.

Step 1: With cast on edge upwards and beaded side facing, use your other loose needle to pick up each loop along the cast on edge. The number of loops you can pick up between stitches (17) will actually be one less than the original number of stitches you casted on (18). So when you get to the end with the cast on tail, just dip down into the chain selvedge stitch there and pick up the side of the stitch.

Pick up loops along cast on edge

Pick up loops along cast on edge + side of selvedge stitch = 18 total stitches on needle

Step 2:  Hold beaded sides together and cast on edge to front. Bring the cast on edge needle up to the other needle so that the needles are parallel and close together.

beaded sides together and cast on edge to front

beaded sides together and cast on edge to front

Hold needles parallel

Hold needles parallel

Note: I’ve used 2 different color needles in these photos just so you can clearly differentiate the live stitches at the end of the knitting (gold color needle) and the picked up loops along cast on edge (blue needle).

Step 3: Work 3-needle bind off as follows:

Using larger size needle as your working needle, insert needle as if to knit through both the stitch on front needle and stitch on back needle, then knit these stitches together.

insert 3rd needle wrap yarn to k2togcomplete the k2tog stitch

The first completed k2tog stitch

The first completed k2tog stitch

* k2tog front and back needle stitches again, pass previously completed stitch on right-hand needle over the k2tog stitch just made. Repeat from * to end of row.

k2tog the next set of stitches

The second k2tog stitch compeltedContinue across all stitches

All stitches have been joined and only the loop from last stitch of 3-needle bind off remains

All stitches have been joined and only the loop from last stitch of 3-needle bind off remains

Step 4: Cut yarn and pull tail out of remaining loop to secure against unraveling.

the completed join

The completed join

Here’s the completed seam join (with a peek at the beaded side).

finished-bind-off-seam-on-wrong-side-with-peek-at-beaded-right-side

Step 5: Weave in ends invisibly on WS.

Completed seam with ends to be woven in

Completed seam with ends to be woven in

Completed cozy with ends woven in

Completed cozy with ends woven in

Close-up of seam line

Close-up of seam line

For all practical purposes, the seam is invisible on the RS. Also, the design integrity is maintained because there are exactly 2 ridges between the framed shamrock motifs just as in the areas that were knitted. What do you think?

I hope you enjoy using this no-sew version of minimalist seaming for your Irish Coffee Cozy and possibly other similar projects in the future.


Posted in Bit-size Tutorials | 2 Comments

Overcoming a Knot Too Happy Encounter

oh-oh — not a knot!

Suppose you have strung beads on your project yarn and are merrily knitting along on your beaded pattern. Then, you encounter a knot or other fault in the yarn which does not allow you to continue to push the beads down along the yarn. Oh, no! What to do?

I’ll show you step-by-step how to transfer beads from your project yarn to a temporary thread so you don’t have to re-string all the beads. Once the beads are on the temporary string, you can re-transfer them back to your project yarn using the same technique you learned in Transferring Pre-strung Beads so you can proceed again with your knitting.

What to do if you run into a knot so you don’t have to re-string  beads

First, make sure it actually is a knot rather than just a kink or slightly larger area in the yarn that can be dealt with by a bit of straightening. No use making things more complicated than they need to be. Sometimes there is just a a bit of extra thickness in the yarn because of a bump of “fuzz” which can be removed without damaging the integrity of the yarn. Then you can proceed normally.

Well, one can hope that the knot encounter is a false alarm. Failing the test above, let’s proceed with the next steps.

Here’s an obvious knot I made for demonstration purposes where there is no way the bead holes are large enough to pass over.

Encountering a knot

Encountering a knot

Tools and Supplies Needed

For cutting out the knot and transferring the already-strung beads to a temporary thread, you will need only 2 things:

  1. Scissors
  2. Some thin, yet strong and non-slippery thread. e.g. cotton or cotton-blend quilting thread

Chocolate or beverage of your choice is optional. Overcoming the knot isn’t really a difficult task, but given it might be your first time, some extra fortification might be comforting.

Cut Out the Knot

Just scoot your beads away from the knot (several inches if possible). Then cut the knot with scissors.

Cut the knot

Cut the knot

Discard the knot. Set aside the end that is attached to your ball of yarn awaiting to be knit (i.e. the end without beads). For a while, you’ll only be working with the end of yarn with the beads strung on it.

The Weaver’s Knot

It might seem incongruous that I am going to now have you make another knot.

What? you say! You just had me cut out one knot and now I am going to make another?

Well, yes. But this is a special knot. 🙂 You see, it is going to allow you to tie on the quilting thread with the barest added thickness, and allow you to transfer the beads to the thread so you can re-transfer them back to the yarn awaiting at the ball end. This knot is called a weaver’s knot. The version I am going to show you here is very compact, yet strong and non-slipping when you follow the steps. I am breaking it down to several steps, but it actually can be made quite fast with just a bit of practice.

Step 1: Using the yarn with beads strung on it, make a loop with the cut tail end positioned underneath.

Loop cut end under

Loop cut tail end under

Step 2: Insert the quilting thread up through the loop from underneath, then pull it upwards and over the yarn tail end.

Pull thread up through loop and over the tail

Pull thread up through loop and over the tail

Step 3: Bring the thread to the back around the yarn tail clockwise …

Thread under tail end of loop

Thread under tail end of loop

Step 4: … then down through the hole in the yarn loop.

Thread down hole in loop

Thread down hole in loop

Step 5: Tighten the knot. Start by pulling the 2 strands of thread away from the yarn loop.

Start pulling the knot snug

Start pulling the knot snug

Knot almost pulled snug

Knot almost pulled snug

Pull up on thread ends, then tighten the knot further by pulling the 2 ends of thread in opposing directions. Test that the knot does not slip; if it does, tighten more.
Pull up on thread ends

Pull up on thread ends

Give the thread ends an extra tug in opposing directions

Give the thread ends an extra tug in opposing directions

The completed Weaver’s Knot is compact and should look similar to this.

Weavers Knot completed

Weavers Knot completed

Transferring Beads to the Temporary Thread

Now you are ready to slide the beads off your yarn onto the temporary thread. Test out a few beads just to make sure that the knot is holding.

Pushing beads up ...

Push some beads up to the Weaver’s Knot

Pushing beads over the weaver's knot

Push beads over the knot

Then proceed to slide all beads off the yarn to the temporary thread.

Push beads off the yarn onto the temporary thread

Push beads off the yarn onto the temporary thread

Proceeding with Your Knitting

Once the beads are on the temporary thread, you can cut the Weaver’s Knot.

Then using the same technique in Transferring Pre-strung Beads, re-transfer the beads to the other awaiting end of yarn attached to the yarn ball. After the beads are back on the yarn, proceed with your knitting. You’ll have 2 extra yarn ends to weave in later because of cutting out the knot, but at least you have saved the time to re-string the beads.


Posted in Bit-size Tutorials | Tagged , | 1 Comment

I Hate to Purl and more about Beaded Garter Stitch

Do you hate to purl?

Last March we had a just-for-fun poll with slightly more than 45% of members who responded falling into the categories of “I hate to purl” or “I don’t hate to purl, but I’d rather knit”.

I myself don’t really hate to purl, but must admit I do prefer to knit. If you fall into this category or the “I hate to purl” camp, you will love beaded garter stitch. Either way, I hope you enjoy making this month’s Irish Coffee Cozy.

beaded garter stitch

The cozy is worked in garter stitch (i.e. knit every row) with a tidy, stretchy slipped stitch chain selvedge at each edge. You will be working back and forth to make a strip of fabric which is later joined into a tube.

After you have cast on your 18 stitches, you are ready to start knitting the beaded Shamrock Motif using either the charted or written instructions. Reminder: If you use long tail cast on instead of the simple half-hitch cast on, then start with row 2 instead of row 1.

Beads are placed on wrong side rows, since beads want to go to the bumpy side of the stitch. This makes the beaded pattern show up on the right side (i.e. outer-side of the fabric when completed/used).

In case working Beaded Garter Stitch is new to you, or if you’d like to review, there are pictures, tips & techniques in this article from last year’s Beading Hearts Friendship Bracelet KAL.

Beaded garter stitch is not reversible

knit a strip of fabric which is later joined into a tube

Whereas regular garter stitch is reversible, beaded garter stitch is not.

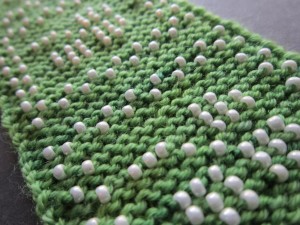
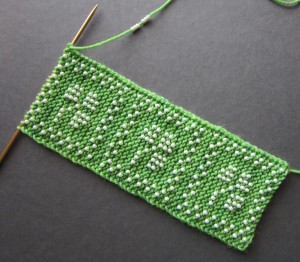
The picture above is what the almost-completed strip of beaded garter stitch looks like for Irish Coffee Cozy as viewed from the beaded side.

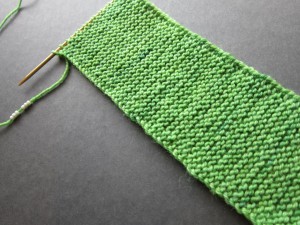
And below is what it looks like when viewed from the wrong side; i.e. the beads do not show up at all and the fabric just looks like garter stitch.

beaded garter stitch from the wrong side

Beaded garter stitch is even-count

Because the gauge of garter stitch is basically 2 rows = 1 stitch, the fabric is a great canvas on which to design even-count designs or even adapt simple even-count charts from other fiber disciplines such as cross-stitch, needlepoint and filet crochet.

Does this sound familiar? Coincidentally, last month’s KAL project for knitted filet lace was also adaptable to even-count designs.

Beaded garter stitch is horizontally flipped

If you compare the orientation of the shamrock chart image in your pattern instructions, you see how working from the wrong side results in a horizontally flipped image when viewed from the right side of the beaded fabric.

Tip: If you are designing your own beaded garter stitch motifs that have a definite left and right, remember to keep this in mind by mirroring your chart.

The “rest row” of beaded garter stitch

Since beads are worked into the knitting on the wrong side rows, those rows are the “pay attention” rows. The right side rows are then the plain knitting “rest rows” (whereas in lace knitting, the wrong side rows are usually the “rest rows”).

Making beaded garter stitch more elastic

Just like regular garter stitch, beaded garter stitch is inherently elastic. If you working with an inelastic fiber like cotton, you can boost the elasticity by knitting into the back loop of stitches on the return non-beaded row rather than plain knit. This also has the advantage of further locking the beads firmly into the fabric.

Note that knitting into the back loop does subtly change the gauge since you are twisting the stitch, which also tightens it a bit. But that is not really a problem for what we are doing here.

Posted in Bits of Beads | Leave a comment

sometimes it’s the simple things

After you’ve completed stringing beads onto your yarn for Irish Coffee Cozy, its time to cast on. You won’t be using beads for a while, so slide them down along the yarn out of the way until needed later when knitting the beaded design.

In the previous KAL Kick-off article, I promised 2 different methods for casting on that are well-suited to seaming a strip of garter stitch end-to-end using without the complexity of a provisional cast on.

The part that simple half-hitch cast on plays in seaming

Sometimes it’s the simple things in knitting often forgotten that work the best. Using the simple half-hitch cast on might be one of those. Continue reading

Posted in Bit-size Tutorials | Tagged , | Leave a comment

Kick-off for February KAL: Irish Coffee Cozy

Go Green while celebrating luck and laughter in the Irish tradition

In time for St. Patrick’s Day celebrations or knitting lucky shamrocks anytime, February’s project in the Beyond BOBBOL 2014 KAL Series is Irish Coffee Cozy.

Irish Coffee Cozy KAL

Forego cardboard sleeves at your local coffee shop and use this attractive cup huggie to turn plain coffee into a no-added-calorie, non-alcoholic way of making “Irish coffee”.

Need a gift idea? Knit some for co-workers and friends, even if they are not Irish.

Irish Coffee Cozy pattern is available now for free download or discount purchase according to your membership level. Be sure to go to the special Knit-A-Longs page HERE to see your best offer. These limited time offers run Feb 5 – 25, 2014.

Need Supplies?

Need yarn or beads? Supplies Paks are available for this KAL. If you already have yarn, bead colors in the size needed for this project are available for purchase here.

Starting Irish Coffee Cozy

Continue reading

Posted in Bits of Beads | Tagged , , , , | Leave a comment

January Winner and New Giveaway for February

Congratulations to Sue Honig, winner of the January Prize Drawing. Thanks so much to everyone who participated. Are you ready for another giveaway?

No other month of the year says “pink” to me as much as February. How about you? So, for the February giveaway, I’ve put together a special edition “pink” kit of yarn and beads for you to play with and create whatever your heart desires.

February Giveaway: Heart’s Desire Special Edition Prize

This prize includes yarn and beads to play with in whatever way you want:

  • 2 skeins of  yarn, each in a different, yet compatible colorway
  • beads in contrast color for bold design accents
  • beads for sparkly tone-on-tone accents

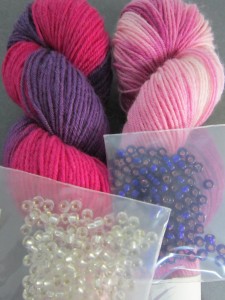
2014 February Giveaway of yarn and beads

Each skein is 2 oz (57 g) /  215 yards of Lorna’s Lace Shepherd Sock 4-ply fingering weight 80% superwash wool and 20% nylon. 4 oz (114 g) / 430 yards total.

The colorway on the left is called “Girly Stripe”; the one on the right is “Tickled Pink”.

This yarn is luscious-feeling, yet sturdy. There is plenty enough yarn to use for separate 1-skein projects such as scarves, hats/berets, etc. Or use together for one-of-kind, serendipitous color play.

The glass seed beads are high quality Miyuki size 6/0 (4 mm diameter) in 2 colors of 10 g (approx 120 beads) each: silver-lined violet and silver-lined crystal. A total of 20 g (approx 240 beads).

If you need inspiration or guidance on using beads, there are lots of ideas in lessons we’ve had for past KAL’s. (these are still available to view for free whatever member level you are). And there will be even more ideas in the March KAL, but for now that’s a secret, lol.

To Participate in the February Prize Giveaway

You don’t have to do anything if you are Premium Level member — you are automatically entered as part of your Premium members benefits! However, if you want to increase your chances of winning even more, any purchase from the KnitHeartStrings Store during Feburary 2014 counts as an additional entry.

Not  a Premium member? To enter the giveaway, you can purchase anything from the KnitHeartStrings Store during February 2014 (any purchase already made this month will count). This includes upgrading to a paid membership level (Basic or Premium) or making a donation (see sidebar to right).

The random drawing  will be held on March 1, 2014. Good luck!


Posted in Just for Fun | Tagged | Leave a comment

Sneak Peek for February’s KAL – Supplies Paks now available

Can you believe it is almost time to finish the formal part of the KAL for I Heart Filet Scarf? If by chance you have not yet gotten the pattern, all KnitHeartStrings members can still download it for free before Jan 25th.

Looking ahead to next month’s project in the Beyond BOBBOL 2014 series, get a sneak peek now at Next Up KAL.

Diana wrote:So far I have enjoyed most of your patterns & tips thanks. I would like to see in this new year especially when the patterns call for beads. If there would be a kit with the beads that we could purchase that would be great. I know I am asking for so much …“.

I answered: “I offered Supplies Paks for November’s Easy Elegance Mitts, and that was well received. So I don’t think you are asking too much, lol. Good idea about offering kits for some of the patterns this year. I won’t be able to do that all the time since I am away from my studio for about half the year. But I will see what I can do, starting with next month’s KAL pattern which is a beaded one. Thanks for the suggestion!

With Diana’s suggestion in mind, I have Supplies Paks for the February project KAL available for purchase now. There is even an upgrade option to have me string the beads for you (yah – I know I am crazy!! but I’m not giving you any excuses to not try knitting with beads).

[wp_eStore_fancy10 id=101]

I still encourage you to stash dive or give yourself an excuse to visit your local yarn shop for the supplies to make Irish Coffee Cozy. But if you’d like the convenience of one-stop shopping, I can get a Supplies Pak of your choosing out to you as soon as possible. Be aware that supplies are limited, so some color choices may be eliminated as inventory runs out.

Posted in Bits of Beads | 1 Comment