How are you doing with the Christmas in July project? I hope you are enjoying “Antique” Satin and Lace Ornament. Are you doing the beads? Read on for more about the “slip/slide a bead into place between stitches” technique used for knitting with beads in this project.
Preparation
Although the “slip/slide a bead into place between stitches” is easy to do, it does require beads to be strung onto your yarn/thread beforehand. Since this project only requires 36 beads, it’s a good time to try knitting with beads using this technique.
* The first point I want to make is that there really is no need for a special beading needle. So don’t let that hold you back from enjoying the experience and results of knitting with beads.
* If your beads have come on a pre-strung strand of thread, simply transfer the beads that you need as described in this month’s project pattern. If you’d like more detailed step-by-step visuals to show you how I transfer beads pre-strung on a temporary thread to the project yarn/thread, I’ve got a photo tutorial at my Jackie E-S blog on Transferring Pre-strung Beads.
* For loose beads, you can use the “waxed thread needle” method as described in the project pattern. Any kind of bee wax or paraffin wax can be used. You might already have some of this on hand with your sewing notions? Or a block of paraffin wax for use in canning jams and jellies? I do recommend using a non-colored wax (i.e. not a colored candle) so that it does not transfer unwanted color to the inside holes of the beads and then later to your project.
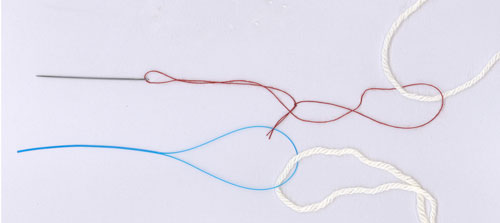
* Besides the “waxed thread needle” method, there are 2 other commonly available needles you may already have on hand to get your loose beads strung without special equipment.

Top of photo: Use a fine sewing needle or tiny tapestry needle. If you have trouble getting your yarn through the eye of the needle, you can make your own larger “sewing thread eye” as follows:
- Thread the eye of your needle with the short length of strong sewing thread such as quilting thread.
- Holding both ends of the sewing thread together, make a simple overhand knot and pull snugly.
- Clip the ends of the knot a short distance from the end.
- Now you have an “eye” through which you can easily pass your yarn.
Bottom of photo: Floss threaders are available in the dental supplies section of stores. The tip of the floss threader is used as the “needle”. The big “eye” of the floss threader makes for easily threading your yarn/thread through it. The collapsing eye allows you to easily push beads over the eye and onto your thread/yarn.
Next up: Slip/sliding a bead into place
Tomorrow I’ll post Part 2 of the Bit-size Tutorial about Easy Knitting with Beads for our Christmas in July project. I can’t wait to see you again!


 HeartStrings FiberArts
 Knitting Bits of Lace on Facebook
 Ravelry Store
Pingback: Easy Knitting with Beads: Slip/sliding a bead into place | Knit HeartStrings