In this Part 2 of Easy Knitting with Beads, I’ll be sharing pictures and tips about the “slip (or slide) a bead into place” method.
Once you have your beads strung on your yarn/thread, now the real fun begins.
Cast on for your project and begin knitting. As you knit, carefully push the beads down further along the yarn until you need them. When you come to a place where you want to place a bead, just slide a bead up along the yarn until it is right next to the last stitch you worked.

Slide a bead into place
When making the following stitch, take care that the bead is not pulled through the loop while making the new stitch.
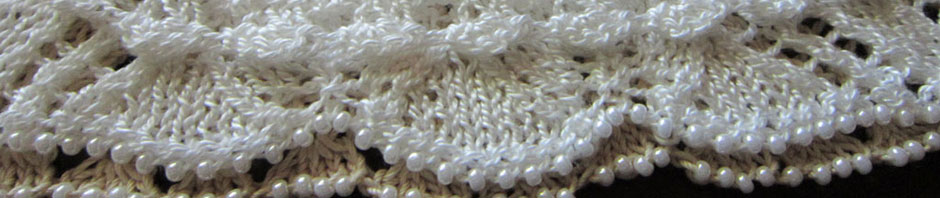
In the lace edging pattern for the Satin and Lace Ornament, the last stitch worked before placing a bead is a knit stitch. Thus in the above picture you see that the thread is at the far side of the needle (and thus the bead has been scooted up close to the back of the right-hand needle). The next stitch to be made is another knit stitch. Thus the bead will end up on the running thread between the stitches and toward the back of the fabric.

Placed bead is on the running thread between two knit stitches
Because the thread is in back of the needle, the bead shows up best on the opposite side of the work. I.E. in this pattern, your bead placement rows are actually wrong side rows. You will want to keep this in mind when you are later attaching the beaded edging to the ornament ball so that you get the full effect of the beads.
Tip 1: Beads want to go to the bumpy side of fabric that surrounds them. Thus, if a bead is placed between 2 knit stitches, the bead will show up on the opposite side of the fabric. If a bead is placed between 2 purl stitches, the bead will show up on the side of the fabric facing you.
Tip 2: Look for opportunities in other stitch patterns to place beads. If you see purl stitches, imagine how beads would look there!
Tip 3: To lock in a bead more firmly, work through the back loop of the stitch before and after the bead; e.g. knit 1 through back loop, slide bead, knit 1 through back loop.
I love knitting with beads and would love to share even more beady things with you. But we are already past the half-way point this year and I still have lots more to share with you on lace edgings. Think about whether you might want to do Bits of Beads in 2013? Let me know your thoughts.

 HeartStrings FiberArts
 Knitting Bits of Lace on Facebook
 Ravelry Store
Fantastic tutorial!
Thank you for sharing your knowledge with us Jackie.
It’s very very much appreciated.
I’d also like to see more Bits of Beads in 2013!
Jackie – I hate to be a bother but is there a chart anywhere that says what size beads to use with what size yarn? I live waaaay out in the country and there are absolutely no yarn stores or bead stores around here – the nearest is a Michaels about 35 miles one way. So, I do most everything on the internet and you wouldn’t believe how hard it is to hold an imaginary piece of yarn up to an imaginary bead to see if the yarn will fit through the hole! Consequently, I haven’t done any beading yet although I would love to.
Any guidance you can offer will be very much appreciated. Thanks.
My HeartStrings knitting patterns will always tell you the size bead used for the specified yarn weight. So that is one way to know.
For the method I have discussed here where just one strand of yarn/thread goes through the bead, the guidelines for corresponding yarn sizes are:
* size 5/0 (5 mm) :: worsted weight
* size 6/0 (4 mm) :: sport/DK weight
* size 8/0 (3 mm) :: fingering weight
* size 11/0 (2 mm) :: lace weight
If a different method is being used to incorporate beads into the knitting (e.g. if 2 strands of yarn need to go through the bead, then go to the next larger size bead). For example, the “crochet hook” method used in the Peek-a-Bead Scarf uses size 6/0 (4 mm) beads with fingering weight yarn.
Thank you Jackie for your delightful bit-sized tutorials. I have learned a lot and it is so good to be able to learn and complete small items instead of facing a large project and struggling to follow instructions. Purchased one of your Smoke Ring patterns some time ago and have now reached the part where I have to use beads again so this will refresh my memory and get me going again. You are so kind to share your knowledge and creativity with a wider audience. I live in Cape Town, South Africa and we do not get many opportunities for learning with a teacher.