
Patti T wrote: Thanks so much for this lovely double pattern! The perfect project for a special skein of fingering weight wool. And the “pull over” bind off is ingenious! I look forward to another year of premium content when I renew in March.
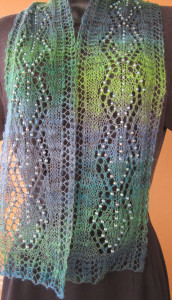 Besides the bonus Beaded Lace Leaves chart posted 2 weeks ago, I have one more Bonus Extra for you this month! It is for a Halfsies Scarf with Matching Ends.
This will appeal to those who prefer exact symmetry to your scarves. A scarf with matching ends might also be preferred if you are outlining the leaves with beads, as that will make the motifs stand out even more and highlight their direction when the scarf is worn.
Converting End-to-End to Halfsies
Simply put, to convert the original Spring Lace Leaves end-to-end scarf instructions into a version with 2 identical halves:
1. Work Outer Border and Inner Border as given in pattern instructions.
2. Work Main Area as given except repeat only until half the desired length of scarf, and completing through an even-number row.
3. Cut yarn and put stitches for first half on hold.
4. Work second half the same as in steps 1 and 2 above. Cut yarn.
5. Join the 2 halves (I’ll demonstrate below the “pull over” join for those who fear grafting or just want to learn an easy no-knit, no-bulk join).
Pull-Over Bind Off
Using the Pull-Over Bind Off for joining is an easy alternative method to grafting. Just like grafting, the pull-over bind off can be used to join the live stitches of 2 pieces of knitting. The resulting seam is nearly invisible to all but the most discerning eye.
The approach is simple: a live stitch of one half is alternately pulled over a live stitch of the other half to secure against raveling. That’s it! There is no knitting and no sewing involved.
I’ll show you step-by-step below how to join scarf halves together with pull-over bind off. But first I know some of you are itching to say you want to graft your scarf halves together. So let me say a few words about that first …
Pull-Over Join vs. Grafting
I’m not going to try to convince you that the pull-over method is better than grafting. But I do want to make the case that it is easier, and thus a good alternative for those who do not want the fuss or fear of grafting.
Like grafting, the pull-over join results in a no-bulk seam and is side-neutral.

Like grafting, the pull-over join will not result in a ‘perfect’ seam. Because of the looped structure of knitting, when 2 pieces of knitting come together from opposite directions, the alignment will always be one-half stitch off. Therefore, even if grafted, the seam will have a slight jog in the continuity of the stitch pattern.
The Pull-Over Join is just a compromise in favor of an easier method than grafting. Since the seam will not be perfect anyway with grafting, the pull-over join gives us a nearly-as-good-as seam without the extra fuss (and fear) of grafting. The resulting seam is nearly invisible, assuming there is no sudden difference in colors at the seam line (which would of course cause the same problem in grafting).
Pull-Over Join Step-by-Step
Step 1: Transfer all live stitches of the 2 halves alternately to one needle.
Note: I am demonstrating here with 2 beaded halves worked through row 10.
Hold halves together with same sides facing.

In the photo, I have right sides facing, but you could work the join just as easily (and it should produce the same results) if worked with wrong sides together.

Transfer first stitch from one half to an empty, spare needle. Since you aren’t going to be knitting, it really doesn’t matter what size the empty needle is, but I usually use the same size needle (e.g. the loose needle from the pair of needles I was knitting the second half with). You could even use a smaller size needle. You’ll just want it to be long enough to accommodate all the stitches of both halves.

Transfer first stitch of other half. Then keep transferring the live stitches alternately to the spare needle until all stitches have been transferred.


Now we are ready to bind off!
Step 2: Work pull-over bind off
Position so that you are working from the point of the needle.

Note: If you happen to have used a long double point needle as your spare needle for transferring stitches, it doesn’t matter which end of the needle you work from. I love it when I don’t have to keep up with extra details, don’t you?!
Slip 1 stitch purlwise. * Slip another stitch purlwise.

Pull the stitch you slipped first over the second stitch you slipped …

… and off the needle. 
You’ve now bound off one stitch. Repeat from * until only last stitch remains on needle.

Secure last stitch by pulling yarn tail through loop.

The Completed Pull-Over Join
From the right side …
From the wrong side …
You can see where the join is since there is a difference in color (one of the downfalls of using a variegated yarn for a “matching ends” scarf, lol!). But otherwise, the join is pretty good AND easy to do. What do you think?

 HeartStrings FiberArts
 Knitting Bits of Lace on Facebook
 Ravelry Store
Would this work on joining shoulder seams of a vest? Or would the kitchener stitch still be the one to use?
Yes, this technique will definitely work on shoulder seams of a vest. In fact, it will produce a more stable shoulder seam than kitchener stitch will.
I am the luckiest person in the world today!! I won the March giveaway so I can make the scarf just as in the photo! I am tickled as well because I was too busy to knit the scarf during March because of work and now I have the time to do it. Thank you so much, Jackie, for all the positive things your knitalongs provide us. You are very special and very generous!
I too am very lucky to have you in our knitting group. Thanks for all your positive energy.
Jackie,
This method also works for items like rectangular or oval dollies which are started in the center with a large number of stitches (on a provisional cast on) that need to be closed at the end. It’s a little fussy putting the stitches together, but looks so much better than sewing.
Bev, I like that idea. We hadn’t yet had a center out rectangular or oval doily yet that started at the center, but I’d been thinking that we might in the future if there is interest. Will certainly keep this pull over join in mind for that!
Thank you so much. As a graftaphobic I am eternally grateful for such a simple and logical substitute.
“graftaphobic” — Hadn’t heard of it put that way before!
This is a very interesting tip, thank you Jackie. Although I am comfortable grafting the few stitches as in a sock, there are projects which I have shunned due to longer sections of required grafting. Items such as the hood of a sweater or scarf and some collar sections had instructions for grafting, but now I have another tool in my box of tricks to do such a join without the angst!
Come to think of it, I first did begin using this pull over method with long runs of stitches. Thank you for pointing out that advantage.
Hi, Jackie ~~~
I really appreciate your lesson on the pull over bind off. I don’t mind grafting a short length of stitches, but a significant stretch of grafting is intimidating, so I’ll definitely use the pull over method for that. One suggestion, though, which is something I always do when binding off conventionally. Instead of working 2 stitches onto the R needle, then lifting the 1st stitch over the 2nd stitch, etc., I simply work the last row (always on a larger needle size because I have tight tension) on a double-pointed or circular needle. Then I begin at the 1st stitch worked (not the edge with yarn still attached) & simply bind off using a crochet hook, reaching through the 1st stitch, grabbing the 2nd stitch & pulling it through the 1st one, then repeat across. I find this method much easier n& quicker than regular binding off & it yields an extremely neat & even finish. This crochet trick would certainly work with the pull over bind off, too, yes?
P.S. Like another commenter, I also just became a Premium member due to the Lace Leaf Scarf offerings & am so pleased with all the benefits! Thanks so much for your mos helpful teachings & lovely patterns!
Hi Marty, That’s a good point about the pull over method being useful to join across a significant number of live stitches.
The “crochet trick” could be used with these caveats:
1. Do NOT work the last row of each half on larger needles (as you say you always do that); if you enlarge these stitches, it is going to become sloppy. (you already have 2 sts worth of yarn going into the width of 1 stitch column — that results in plenty of give and you don’t want to contribute to extra distortion by having loops that are larger).
2. In the transfer step, use a spare needle that is significantly smaller (so that when you are doing the crochet maneuver, you will have enough clearance).
Does this make sense?
As with most things, there are various ways to accomplish the same thing. So thank you for mentioning. I did not myself want to give the impression to others that a crochet hook and smaller spare needle was required to accomplish this type join. But I do agree that if you have these extra tools on hand, the crochet hook trick can make things go more quickly (especially significant if you start dealing with lots and lots of stitches!).
So glad to have you as a Premium member. Thanks again for your help and sharing tips, too. Thanks again. 🙂
Going Halvsies appears to me to be a simple way of getting around a joining job. Thank you for this method.
When I get to center back of scarf I just turn the pattern upside down and continue on so I don’t have a seam in the back. It takes a little concentration at first but once pattern is set it is easy. I think a bind off looks better than a seam, seen or unseen. But that is just me.
Just turning the pattern upside down works for non-lace things like cables, simple textures, and colorwork.
But unfortunately it does not work for most lace (the filet lace we did for January’s KAL was an exception, and that is why we could get matching ends by just turning the pattern upside down).
See The Directional Nature of Knitting Lace.
You can prove it to yourself by going ahead and turning the pattern upside down to see what you get. Does this make sense?