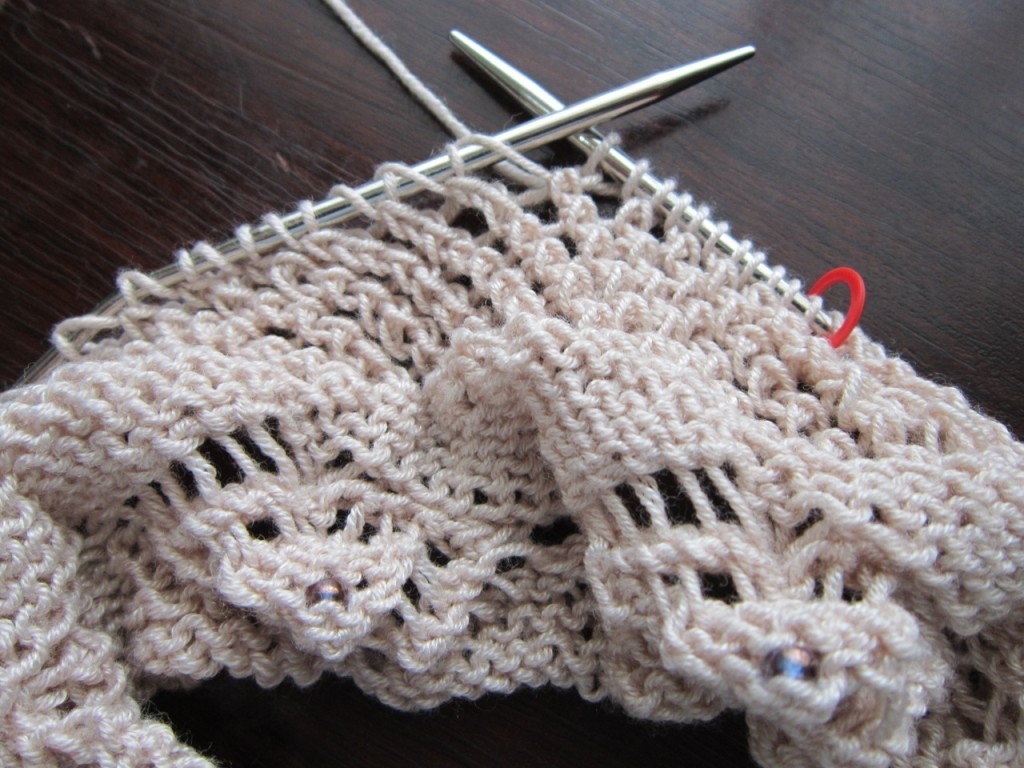
Let’s continue on with knitting the Pretty Awesome Yarn Pouch. At this point, you should be ready to start the main body of the yarn pouch. If you missed the previous articles leading up to this point or would like a re-fresher, you can read them here –
 Stitch Markers
If you were using extra stitch markers to separate the 16-stitch multiples for the Lace Edging, you can remove them now, but keep the end of round marker in place.

After the lace edging is completed, the direction is reversed and the main body of the yarn pouch is worked. It is correct that the WS of the lace edging faces you while working the RS pouch body rounds.
 Reversing Direction
Before starting the main body of the pouch, turn the knitting inside out. This will keep the RS of the Lace Edging facing out when it is turned down over the outside of the pouch. It is similar to what we did for the Preemie Hat, except we are working in the round rather than rows.
The place where we reverse direction is where one side of the drawstrings will be pulled through, so a slightly larger hole is not really going to be noticeable once the bag is put into action. But if it will bother you, here is a tip to minimize hole at the turn.
Tip: You can substitute a sl 1 wyib for the last st of the 2nd plain knit round of the Lace Edging before turning. i.e. Knit 2 rnds, working sl 1 wyib in the last stitch of the 2nd round.
 The Fold Line
The first round of the Body automatically creates a fold line because we have reversed the direction similar to what we did with the Preemie Hat
 Eyelets for the Drawstrings
The first round of the Body will also serve as the eyelets through which we will later thread the drawstrings.
 Lace Knitting
This Yarn Pouch is an example doing both knitted lace and lace knitting in the same project. The Lace Edging is knitted lace (yarn overs on consecutive rounds). The remainder of the Pouch is lace knitting since the rounds with yarn overs alternate with a round of plain knit.
Do you notice how there are 2 twisted strands of yarn that separate the holes of the pattern stitch for the Body of the Pouch? This is the distinctive appearance of Lace Knitting vs. the single strand that characterizes Knitted Lace.
 Twisted Decrease
The stitch pattern for the Body of the Pouch is a simple 2-stitch multiple of left-leaning decrease + yarn over. The left-leaning decrease I chose for the pouch is the k2togtbl, since I feel it gives more stability to the fabric than if a ssk were used. Plus, I think it creates a pretty pattern with its hint of texture.
You’re welcome to compare ssk and see what you think and prefer. Do realize that ssk will give a slightly looser gauge (since the stitches are not twisted). But since gauge is not terribly critical for this yarn pouch, it’s a good time to experiment if you want.
 The Yarn Over that Wants to Wander
Be careful of the yarn over that is the last stitch of the lace pattern round 1. It might want to jump over the end of round marker. If it does, grab it back onto the correct side so that it doesn’t mess up your pattern later on.
 Self-biasing Fabric
After completing several rounds of the pattern stitch for the Body of the Pouch, you’ll notice the the pattern leans to the left. This will create the delightful spiraling effect. Who would have though that such a simple pattern stitch could look like we’ve done something complicated.
 Measuring
Since there are lots of yarn over holes on the Body, we can expect that the fabric is going to stretch quite a bit. So when measuring for the length of the Main Body of Pouch, anticipate this by stretching the fabric out somewhat. You should be able to feel when it is just past that point of feeling easy to stretch out, and when you feel like you are yanking on it too hard and it wants to fight you back.
Next up – Completing the Yarn Pouch, including that lovely bottom spiral!


 HeartStrings FiberArts
 Knitting Bits of Lace on Facebook
 Ravelry Store
Pingback: Completing the Pretty Awesome Yarn Pouch | Knit HeartStrings
Until reading this section I was confused as to the k2togtbl as to whether or not the stitch was twisted. To me the stitches in the picture do not look twisted.
Thanks for the info.
I don’t have a picture of that specifically (just how it looks after you have turned the pouch and are working on the body). After you turn the knitting inside out, just rearrange bring your yarn if necessary to where it needs to be for whatever your knitting style is.
Just try it and you should be fine. Sometimes when you try to work these things out in your brain without doing them, the brain makes it seem more complicated than it really is.
Yes, you are right, it’s coming along nicely now.
Wonderful! See how smart you are? 🙂
can you show a picture of how to turn it inside out? won’t the yarn be on the wrong side? please help, it’s pretty so far. thank you