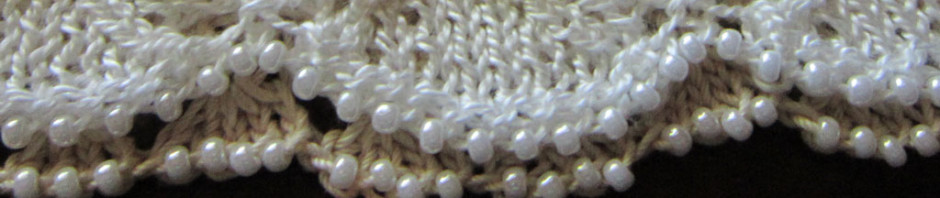
The Long Tail Beaded Cast On results in beads placed along the very bottom edge of the cast on stitches. This type of beaded cast on is very attractive because the beads position themselves away from the fabric’s edge, giving a picot effect along the border.

Picot effect resulting from Long Tail Beaded Cast On
Upper: Beads placed every cast on stitch
Lower: Beads placed every 4 out of 5 stitches
Step 1: String beads on project yarn/thread
Begin by stringing beads on your yarn. You’ll be happy to hear that for long tail cast on, you don’t have to be terribly accurate about counting beads. Also, you don’t have to wait to string all the beads you need before starting to cast on. This is because you can string more beads as needed. I’ll explain why shortly.
For techniques and tips for stringing beads, see:
Stringing Beads Without Special Equipment
Tips for Stringing Tiny Loose Beads
Step 2: Measure for the Long Tail
Simply put, keep it long! You are going to be casting on with the beads on the long tail end, rather than on the ball end as we’ve done before when knitting with beads. So, as you push the beads away from you, you definitely want a long enough tail so that you don’t push your beads off the yarn! It’s better that long tail be a bit longer than necessary to make sure your beads don’t fall off toward the end of casting on your stitches.
As a beginning approximation, The Mathematics of Long Tail Cast On will give a ballpark length without consideration for the addition of beads.
Whatever your method for determining how long of a tail to leave, add in some more length. Your beads are going to be on the long tail between cast on stitches, so a longer tail than usual is needed to accommodate this additional space of the beads.

Beads should be on the tail end when doing the Long Tail Beaded Cast On
Step 3: Beading on the Long Tail
Make sure your beads are positioned on the long tail end before beginning to cast on. This long tail will be the end that is used to make the loop around your thumb. Work the long tail cast on as usual, except slide a bead between stitches as necessary for your pattern.
Need a refresher on Long Tail Cast On? Diagrams or Video
Tip: Since the beads are on the (loose) tail end, you can string just some of the beads to get started casting on. Then string some more beads as needed until you get done casting on all the stitches you need.
Carol Feller has done a nice video here that shows doing the long tail cast on with beads. Note that Carol is using the two-handed version of the long tail cast on. Either the one-handed or two-handed version of long tail cast on can be used. It’s probably good to know both because one or the other might be easier and faster for you when adding the extra step of sliding beads into place between stitches.
Beaded Edging Options for Tea-Time Serviette
For beaded cast on followed by petit scallop edging, you place beads every 4 out of 5 stitches.

Long tail beaded cast on with beads 4 out of 5 stitches
For the variation with beaded edge without the petit scallops, beads are placed between every stitch.
In case you missed the previous KAL article for Tea-time Serviette, you can review Edging Options here.
Practice Time
You might find that Long Tail Beaded Cast On is pretty slow, especially to begin with. It does get easier with practice and figuring out what works best for you to slide the bead into place and hold it there while making the loop over the thumb. I think with practice, you will find you can cut your time significantly from your first attempts.
If you feel the beading is slowing you down too much, of course you don’t really even need to do the beads. They do add a nice touch though, so I hope you will at least give the technique a try.

 HeartStrings FiberArts
 Knitting Bits of Lace on Facebook
 Ravelry Store