
Let’s continue going through the rest of the Lace Edging section of Pretty Awesome Yarn Pouch. Part 1 has already covered through round 6. In this Part 2 article we will begin with round 7.
 Shifting the Round
In round 7, we encounter something you will likely see quite often in lace knitting. Sometimes a decrease occurring at the beginning or end of a stitch multiple needs to incorporate a stitch that is before or after the adjacent stitch multiple. This requires the round to shift either right or left so that the pattern stays properly aligned.
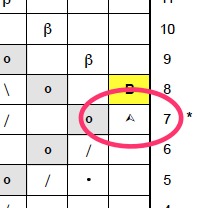
The round needs to shift to keep the pattern aligned
In round 7, we have the situation where the round needs to shift one stitch to the right. This is because the central double decrease (cdd) at the beginning of the stitch multiple needs to incorporate the neighboring stitch in the previous multiple.
How to shift the round one stitch to the right
If using closed ring markers or similar, here are step-by-step instructions:
1. Remove the end-of-round marker.
2. Move one stitch from right-hand needle to left-hand needle.
3. Replace the end-of-round marker in the current position.
Now work a 16-stitch multiple of round 7. I’ll assume that you are using stitch markers to separate the multiples. So you’ll also need to adjust the position of each of those markers before working the cdd of the next multiple.
* After completing the yarn over at the end of the 16-stitch multiple:
1. Move the next stitch temporarily to the right-hand needle.
2. Remove marker.
3. Move stitch on right-hand needle back to the left-hand needle.
4. Replace marker in the current position.
Now you are ready to work the next 16-stitch multiple.
Repeat from * until you have completed all stitch multiples in the round.
Tip: If you are using markers that can be repositioned without moving stitches around on the needles (e.g. split ring markers), then just move each marker one stitch to the right before beginning the round.
Technical note: If you are using double point needles, two circulars, or one circular with magic loop method, you may also want to rearrange stitches so that a stitch multiple does not split across 2 needles (or across loops in the case of using magic loop method).
Watch Out for Wandering Yarn Overs Near Stitch Markers
There’s another little tricky thing in round 7. It is that yarn over at the end of the 16-stitch multiple. Sometimes it might want to work its way over your stitch marker and into the next multiple.
If you are checking your stitch count after completing round 7, you’ll probably notice the wandering stitch and can coax it back home right then. Or when working round 8, you also can grab it back onto the correct side of the marker before knitting into the yarn over stitch.
Just be careful of wandering yarn overs near stitch markers. If you don’t notice they’ve gone astray, it can cause you confusion in coming up with the correct stitch counts or throwing off your stitch pattern.
A Subtle Detail
Are you curious about the k1tbl’s on rounds 9 – 14? Each k1tbl is made 2 rounds above where a yarn over had been made. It is a subtle detail that gives a bit more definition/sharper line above the yarn overs than if just working a plain k1. This is because the k1tbl twists the loop of the stitch just below it, therefore giving a firmer line to the upper part of the yarn over hole.
Technical note: You wouldn’t want to have the k1tbl just one round above the yarn over, because that would twist the yarn over loop itself and close up the hole! (which is obviously not what you intend in lace, lol)
I first noticed using a k1tbl in this way in the original stitch designs of Dorothy Reade. Although I never actually met Dorothy, she definitely was an inspiration in my introduction and upbringing in lace.
Next up … Knitting the Main Body of the Pouch.
Questions? Comments?
p.s. If you are on Ravelry, you can add Pretty Awesome Yarn Pouch to your Ravelry project library. In your Ravelry project area, you can track your progress, record your notes & materials, and share your photos.

 HeartStrings FiberArts
 Knitting Bits of Lace on Facebook
 Ravelry Store
I’m stuck on row 7!!! When you say that I am moving the stitch from the right hand needle to the left hand needle, that stitch is already worked. Does that stitch represent the first stitch in the next 16-stitch multiple?
Is that right?
yes
I am finding that my lace holes are much larger on the K2tbl side than on the k2tog side. Can you explain what technique to employ to correct this? And thank you for explaining why the various stitches are used.
Do you usually get a much larger hole when doing a yo other types of left-leaing decreases – e.g. “yo, ssk”?
I would have to say I honestly don’t know! I suppose when I make my 3rd little pouch, I can try an SSK instead just to see. On other lace projects where I have made SSK’s I don’t see such a drastic difference in hole size so maybe SSK is the answer. And yes, I will be making a third pouch. The second one is almost complete! I am having fun with this – thank you!
I was thinking some more about this. If the difference in hole size is not noticeable when you do a ssk, then the trouble does not appear to be isolated to just the fact that this is a left-leaning decrease.
I expect that for the k2togtbl, the angle of your needles is wider than with the ssk. This would cause the yarn to have a slightly longer distance to travel.
I think that if you insert your needle thru the back loops so that the angle between the needle points is closer together (i.s. more like the same angle as when you do an ssk), this might clear up your problem. Let me know what you think.
Thanks for the quick reply Jackie. I will experiment with needle angle and on the next pouch, I will alternate between the K2TBL and SSK on repeats. This should help me discover where the problem lies! That’s what is so great about this project – it is lovely no matter what and is a small commitment easily completed and allows experimentation with technique.