
How to Place a Bead in Front of a Slipped Stitch (the first of 3 beading methods used in the Mini Sock project). Includes design goals and limitations to consider when playing around with bead embellishments in your other knitting projects.
The first of the 3 beading methods used in the Holiday Beaded Mini Sock is to place a single bead in front of slipped stitch. It is a slight variation on the beading method to place a bead between purl stitches from the right side, which we covered a couple of months ago. As a reminder, we used the latter method when Knitting the Bead Stars in the Mini Flag.
Both methods string the beads on the working yarn beforehand. But thereafter there are differences.
Review of Place a Bead between Purl Stitches from the Right Side (the method that was introduced in the Mini Flag project)
When a bead is needed in the knitting, a bead is scooted up close to the purl stitch that was just completed, then another purl stitch is immediately made so that the bead remains in a horizontal position on the running thread between the 2 adjacent purl stitches. The bottom example in the photo below shows this result.
The “bumps” of the purl stitches on each side push the bead forward so that it remains seen on the right side of the fabric.

3 similar, yet different, methods of bead placement in knitting
How to Place a Bead in Front of a Slipped Stitch (the first of 3 methods used in the Mini Sock project)
By comparison, the middle example in the above photo is the method used in the Holiday Beaded Mini Sock. For this method, a bead is scooted up close to the purl stitch that was just completed, the next stitch is slipped with yarn in front, then another purl stitch is made. The bead remains on the running thread that extends OVER the slipped stitch. So slipping with yarn in front, when you are working on a RS row/round is very important. The bead is in the same horizontal position on the running thread, but now it is lying between 2 non-adjacent purl stitches.
It is the running thread itself that is in front of the slipped stitch that keeps the bead facing out to the right side of the fabric, not the purl stitches themselves. So, another option would be to place the bead in front of a slipped stitch that has knit stitches on each side (top example in photo).
You can see the difference in results between purling vs. knitting on either side of the bead-in-front-of-slipped-stitch method. Which version is used in a pattern will depend on the design goals and functional purpose.
In the case of the Holiday Beaded Mini Sock, I chose to use the purl stitch version. Every other stitch of the k1, p1 ribbing is already a purl stitch, so it is just a matter of slipping a bead in front of the intervening k stitch. This really “pops” the bead forward to make the beaded embellishment prominent.
Minisock beaded ribbing
On the other hand, if you were to use the knit stitch version with k1, p1 ribbing, I think you will find that the bead gets partially hidden within the valleys of the ribbing. This makes the beaded embellishment less prominent. Possibly a design goal for another project, but I did not feel that was what we would want in this ornament. Your choice, though, if you want to do something different.
Stacking Beads in Columns
To create a bit of design and more “bling” effect on the cuff of the minisock, there are two rows of beads placed around the cuff. But because of the intervening slipped stitch, beads cannot be stacked any closer than every other row/round when using the bead-in-front-of-slipped-stitch method. You’ll want to keep this limitation in mind if designing your own beaded embellishments using this beading method.
Bead Spacing on a Row/Round
Another design limitation to keep in mind if doing your own designs with the bead-in-front-of-slipped-stitch method is that the beads can be placed no closer than every other stitch.

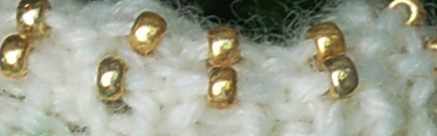
Comparison of bead spacing using 2 different methods of bead placement
The lower example in the above photo is the method of placing a bead on the running thread between adjacent purl stitches. The beads can be lined up in an almost solid row.
The upper example is the method of placing a bead in front of a slipped stitch between non-adjacent purl stitches. The beads are spaced out more and cannot be placed any more closely using this beading method.
Play Around
I hope this will give you the inspiration and motivation to play around with bead embellishment on some other projects you do. For example, as you can see, this method of beading works perfectly with the k1, p1 ribbing on this mini sock. Next time, why not use this beading method to embellish the k1, p1 ribbing on some of your own socks?

 HeartStrings FiberArts
 Knitting Bits of Lace on Facebook
 Ravelry Store